Decay time
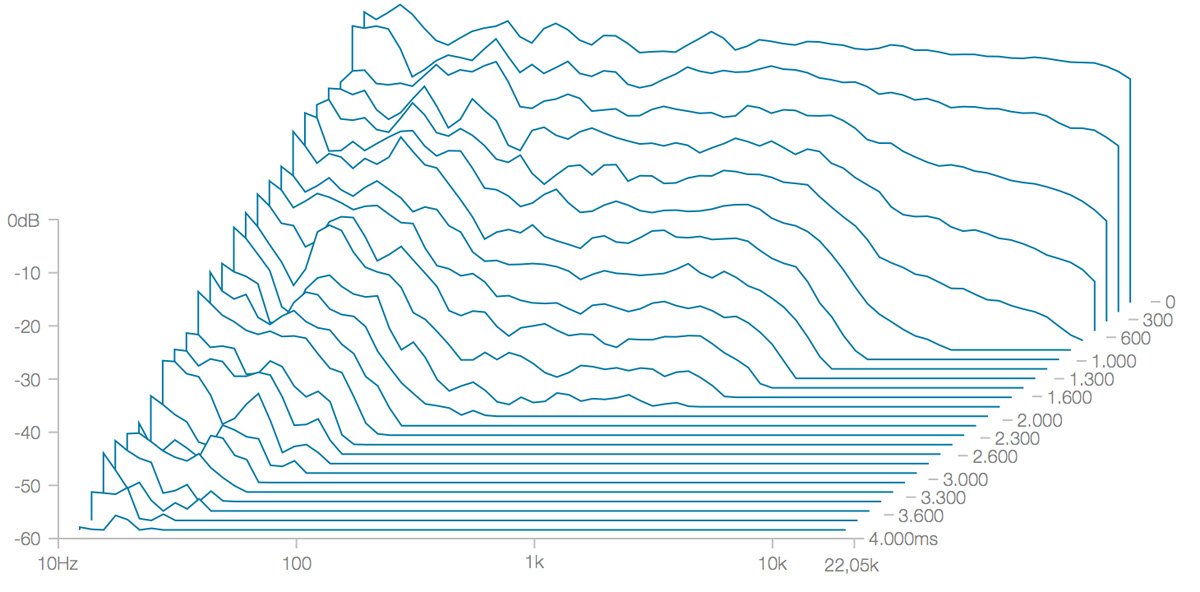
Every sound exists in the context of its surroundings. In most cases we perceive sounds as a combination of the direct sound in conjunction with the sound that is reflected back to us. The amount of time it takes for a sound to dissipate completely is referred to as decay time. This is the reverb's main control as it will determine the type of reverb character. A short decay will result in a small sounding space while a long decay time will result in a big one. In most reverb plug-ins you'll come across, the reverb time is specified as the amount of time it takes for the reverberated sound to drop below -60 dB, also commonly referred to as RT60.
Traditional algorithmic reverbs allow you to manipulate the decay of low and high frequencies independently. In real spaces, high frequencies often dissipate quite quickly while bass frequencies sustain much longer. Having control over low and high decay rates independently allows you to make more natural sounding room models. Determining what kind of character works best for your mix is best judged by your ears, but in general shorter/medium sized rooms/halls will work better for percussive sounds than longer reverbs. Conversely, sustained sounds generally work better with longer decay times. Much like you’d use a traditional EQ to adjust the level for specific frequency bands, FabFilter Pro-R employs a decay rate EQ which allows you to sculpt the decay time per selectable frequency band.

Early and late reflections
The first reflections occurring from boundaries closest to the sound source are called early reflections. Early reflections generally occur within the first 50 milliseconds and play an important role to create the character and size of a room. The level and brightness of early reflections determine how far away we appear to be from a source. As you get further away from a source, early reflections will be less pronounced and there will be more build-up of late reflections as the sound would have already reflected off multiple surfaces. In an algorithmic reverb, a feedback system is commonly used to create the tail of the reverb. In FabFilter Pro-R, we've simply incorporated a distance knob that automatically strikes a natural balance between the amount of early to late reflections.

Pre/Post EQ
A common approach to using reverbs in a mix is to tailor the wet output of a reverb using an equalizer. The idea behind this trick is getting rid of the information that you don't need, mostly high and low end. Most of the time the lowest and highest frequencies in the spectrum are reserved for instruments placed in front of the mix (e.g bass, vocals, drums etc.) so keeping a lot of these frequencies present in the reverb is an easy way to obstruct or clutter your mix. With the use of a pre- or post-EQ you're able to benefit from the width and depth introduced by the reverb without obstructing frequency regions that are reserved for other sources. The easiest approach for setting the appropriate cut-off frequency is finding a point at which you start hearing the filter clearly, then dial it back a bit. Make sure that when you do this, you listen to it in the full context of your mix. For vocals it's not uncommon to place the cut-off frequency (LPF) as low as 2 kHz, since harsh "S" sounds are often not very flattering with the sound of a reverb. For snares you might want to keep a bit more high end as a lot of a snare's bite is to be found in higher parts of the spectrum. There's a lot of debate whether you should place your EQ pre- or post-reverb but if your reverb plug-in has no analog modeling incorporated, it doesn't matter. In Pro-R you can simply use the built-in 6 band post-EQ to tailor your reverb to your specific needs and taste.

Using a pre- or post-EQ in conjunction with your reverb allows you to benefit from the width and depth introduced by the reverb without obstructing frequency regions that are reserved for other sources. Setting the appropriate cut-off frequency is usually done by finding a point at which you start hearing the filtering clearly, then dialing it back a bit.
Pre-delay
The pre-delay knob controls the initial delay between the original sound and the start of the reverb. Using a bit of pre-delay on your reverbs can have impact on the overall clarity of your mix as it allows you to create some separation between the direct and reverberated sound. Creating a bit of space between the two suggests that there will be less masking occurring between the direct and reverberated sound and will result in a clearer sounding reverb. Although adding pre-delay will naturally cause the reverb to sound slightly larger as well, more pre-delay will also result in the direct sound to appear closer. While this might sound counterintuitive, it makes sense if you consider that in a larger space it will take more time for the sound to be reflected back to us. A very common trick is using a pre-delay that is synchronised to the song's tempo.

